warning
Documentation Reference: Review the official Harvester Deleting a Node Documentation for critical prerequisites and safety considerations.
Strict Execution Sequence: All steps in this document must be executed in strict numerical sequence. If any step encounters an error or produces unexpected output, stop immediately and consult Harvester support or your cluster administration team before proceeding.
Cluster Baseline
Before initiating any node removal, verify that the cluster state is healthy and that all active Kubernetes node objects align 1:1 with their corresponding Cluster API machine objects. If any stale or redundant machine objects exist from previous failed deployments, delete them before proceeding.
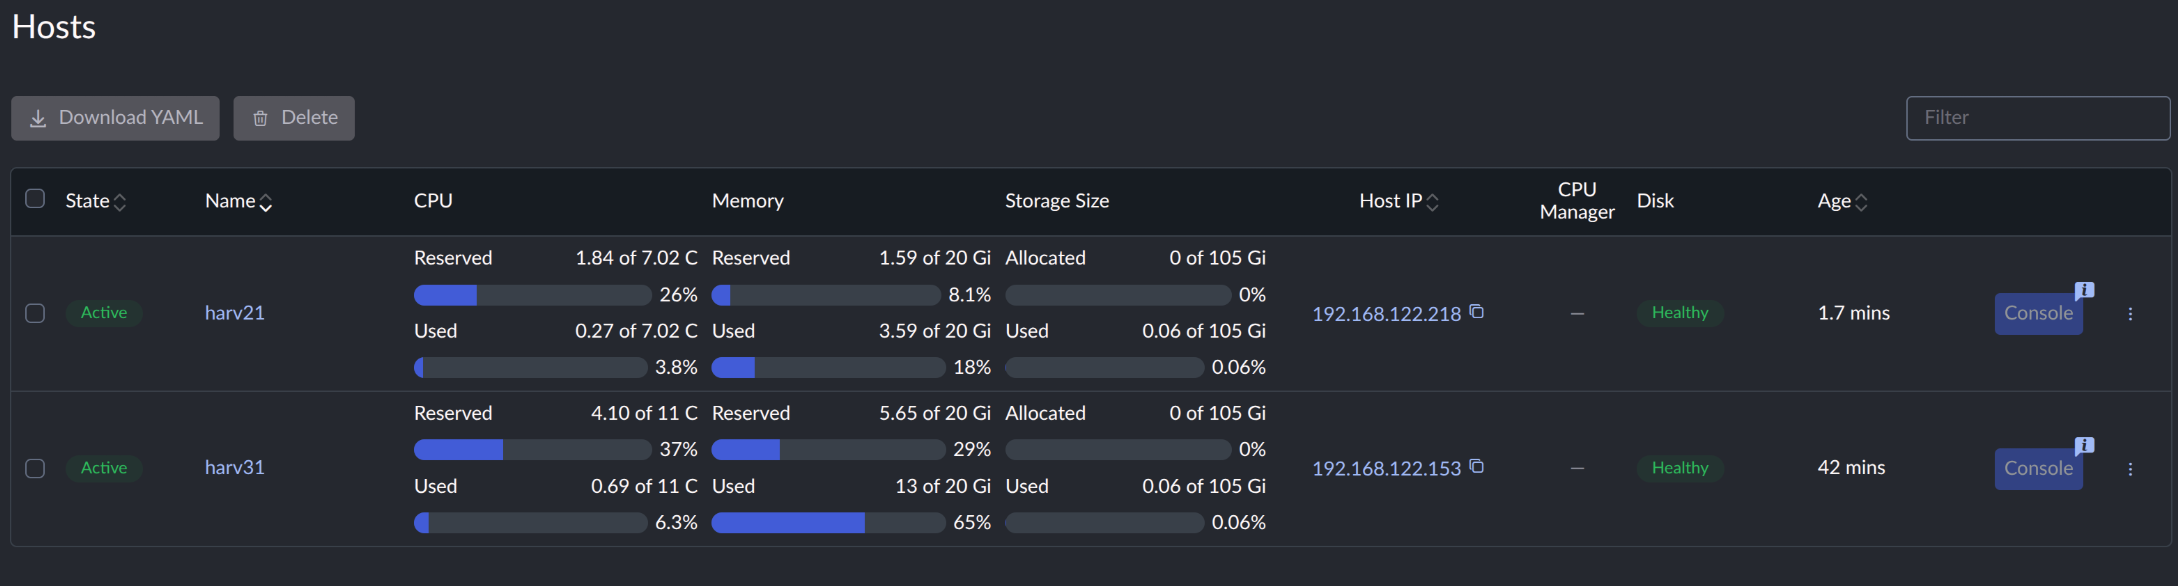
The sample cluster has two nodes, and worker node harv21 will be removed.
harv31:/home/rancher # kubectl get nodes -A
NAME     STATUS   ROLES                AGE   VERSION
harv21   Ready    <none>               15m   v1.36.3+rke2r1
harv31   Ready    control-plane,etcd   56m   v1.36.3+rke2r1

harv31:/home/rancher # kubectl get machines -A
NAMESPACE     NAME                  CLUSTER   NODE NAME   FAILURE DOMAIN   READY   AVAILABLE   UP-TO-DATE   PHASE     AGE   VERSION
fleet-local   custom-2b108e6cb5d9   local     harv21                       True    True                     Running   15m
fleet-local   custom-d9d1ba8f7563   local     harv31                       True    True                     Running   51m
important
2-Node Cluster: In this 2-node sample environment (harv21 + harv31), harv31 is the sole control-plane and etcd node. You CANNOT delete harv31. Removing the only control-plane node will instantly collapse the Kubernetes API server and permanently break cluster quorum. In a 2-node setup, only worker nodes (like harv21) can be safely decommissioned.
Single-Node Cluster: Needless to say, you cannot delete the only node from a single-node cluster. Removing the node destroys the entire cluster control plane and storage layer simultaneously.
Removing a Control-Plane Node in 3+ Node Clusters
If your cluster has 3 or more control-plane nodes (e.g., a High-Availability setup with harv11, harv21, harv31), deleting a control-plane node is supported, but extra precautions apply:
Quorum Health: etcd requires a strict majority to maintain quorum ($N/2 + 1$). Ensure the remaining control-plane count after removal will form an odd number (or maintain quorum requirements) before taking a node down.
Proactive etcd Leadership Transfer: If the control-plane node scheduled for removal currently holds the active etcd leader role, you MUST explicitly transfer leadership to a surviving control node before executing uninstallation scripts.
Control Plane & ETCD Leadership Transfer (Control-Plane Nodes Only)
warning
Do not rely on automatic etcd election timeouts when taking down a control-plane node. Terminating the active etcd leader without prior transfer causes a temporary control-plane freeze while remaining nodes wait for election timeouts. Proactively transferring leadership guarantees zero API server disruption.
If the target node to be removed holds the control-plane / etcd role, perform leadership verification and manual handover before draining or uninstalling software.
Check Current ETCD Leadership
Log in to any active control-plane node and query the member list inside the static etcd pod:
harv31:/home/rancher # ETCDCTL_API=3 kubectl exec -n kube-system etcd-harv31 -- etcdctl \
    --cacert=/var/lib/rancher/rke2/server/tls/etcd/server-ca.crt \
    --cert=/var/lib/rancher/rke2/server/tls/etcd/server-client.crt \
    --key=/var/lib/rancher/rke2/server/tls/etcd/server-client.key \
endpoint status --cluster -w tableThe following example output displays the endpoint status for a three-node control plane cluster:
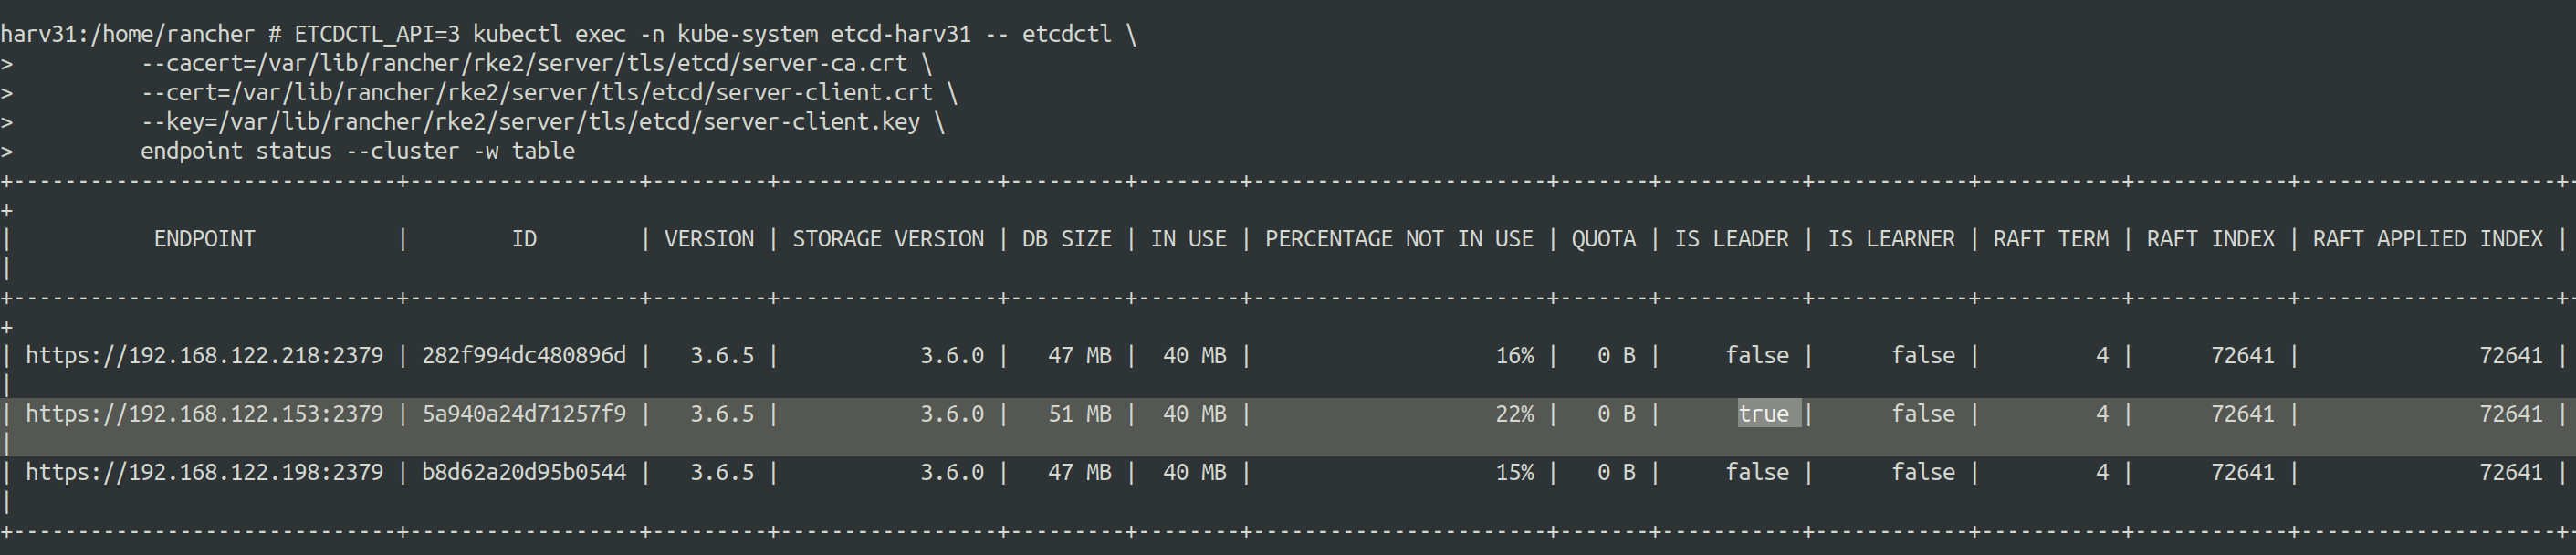
Locate the target node by its IP address in the ENDPOINT column and evaluate the following:
If the target control-plane node has IS LEADER set to false, proceed directly to Prepare the Target Node.
If the target control-plane node has IS LEADER set to true, proceed next step to transfer leadership.
Proactively Move ETCD Leadership
Select a surviving member node from the endpoint status --cluster table that has IS LEADER set to
falseand IS LEARNER set tofalse. Record its hexadecimal ID.Transfer leadership away from the target host to the surviving member ID:
harv31:/home/rancher # ETCDCTL_API=3 kubectl exec -n kube-system etcd-harv31 -- etcdctl \
    --cacert=/var/lib/rancher/rke2/server/tls/etcd/server-ca.crt \
    --cert=/var/lib/rancher/rke2/server/tls/etcd/server-client.crt \
    --key=/var/lib/rancher/rke2/server/tls/etcd/server-client.key \
move-leader <TARGET_SURVIVING_MEMBER_ID>Re-run
endpoint status --cluster -w tableto confirm that IS LEADER has successfully shifted to the surviving node before proceeding.
Prepare the Target Node
Check the official Harvester Deleting a Node Documentation steps before 5. Evict workloads from the node to be removed.
important
Before cordoning or draining the node, backup/export any critical diagnostic data, custom host configs or persistent host path data to a secure remote host. Once workloads are evicted or the node is uninstalled, local ephemeral data and pod logs might no longer be accessible.
Whenever possible, enable Maintenance mode on the target node directly from the Harvester UI via Hosts > Action > Enable Maintenance Mode.
If UI maintenance mode is not accessible/not allowed, prepare the node manually using kubectl
# Cordon the target node to prevent new pod scheduling
kubectl cordon harv21

# Verify that the node status reflects 'SchedulingDisabled'
kubectl get node harv21

# Drain active workloads and local data storage from the node
kubectl drain harv21 --ignore-daemonsets --delete-emptydir-data
Verify Post-Maintenance Cluster Health
Once the target node successfully enters Maintenance Mode (or completes its kubectl drain cycle), do not proceed directly to node uninstallation. Workload migration places extra CPU, memory, network, and disk I/O pressure on surviving nodes. You must verify that the cluster has stabilized before taking irreversible deletion steps.
Perform the following system-level checks on an active control-plane node:
Node Readiness & Resource Overhead: Verify that all remaining nodes report
Readyand have sufficient CPU and memory headroom to handle the re-located workloads:harv31:/home/rancher # kubectl get nodes
harv31:/home/rancher # kubectl top nodesPod & Workload Status: Ensure no evicted pods or virtual machine instances are stuck in
Pending,CrashLoopBackOff, or unschedulable states:harv31:/home/rancher # kubectl get pods -A | grep -v -E 'Running|Completed'Abnormal Cluster Events: Check for recent scheduling warnings, resource exhaustion alerts, or failed volume mounts triggered by the eviction:
harv31:/home/rancher # kubectl get events -A --field-selector type=Warning --sort-by='.metadata.creationTimestamp'Longhorn Storage Health or Third-Party Storage: In the Harvester UI (or Longhorn dashboard / third-party storage management console), verify that all storage volume replicas have finished rebuilding across the remaining hosts and that no volumes remain degraded, degraded-syncing, or in a
Faultedstate.Critical System Services & Business Workloads: Confirm that core cluster add-ons and critical business applications have successfully re-established quorum and connectivity:
- Core Infrastructure: Verify that ingress controllers, CNI networking components (e.g., Canal/Flannel/Cilium), and monitoring stacks are fully functional across surviving nodes.
- VIP / Ingress Traffic: Ensure VIP services or external load balancer targets have updated and are actively serving production traffic without packet drop or high latency.
- Stateful Workloads: Validate that stateful applications (e.g., databases, message queues, key-value stores) have re-attached their persistent volumes and recovered cluster synchronization.
VM Auto-Balance & Migration Thrashing Check: If the Virtual Machine Auto-Balance addon is enabled, monitor active migrations in the Harvester UI. Pay close attention to ensure that workload shifts do not trigger cascading, hyper-frequent VM re-balancing migrations across the remaining hosts due to tight CPU/memory thresholds.
Observation & Stability Window: Allow an observation window (e.g., 30 minutes) before initiating permanent node uninstallation or deletion. Monitor real-time metrics, node load averages, and VM responsiveness to guarantee cluster stability under sustained operational load.
warning
STOP / GO GATE:
If the cluster exhibits degraded storage, abnormal pods, or resource saturation following workload eviction, stop immediately. Fix and recover cluster health before deleting machine or node objects.
Execute Node Uninstallation Script
warning
Target Node Only (
harv21): The uninstall script/opt/rke2/bin/rke2-uninstall.shMUST ONLY BE RUN DIRECTLY ON THE TARGET NODE BEING REMOVED (harv21). Running this onharv31or another active control node will destroy that node's local cluster services.Immediate Destruction (No Confirmation Prompt): The uninstall script
/opt/rke2/bin/rke2-uninstall.shdoes NOT ask for double confirmation or prompty/nbefore execution. Once invoked, it immediately stops services and tears down the node environment. Double-check your active hostname (hostname) before pressing Enter.
Log in to harv21 via SSH/console as the root user and execute the pre-installed script:
harv21:/home/rancher # hostname
harv21

harv21:/home/rancher # /opt/rke2/bin/rke2-uninstall.sh
++ id -u
...
...
...
+ echo -e '\e[31mCleanup didn'\''t complete successfully\e[0m'
Cleanup didn't complete successfully
+ log 'Removing uninstall script'
++ date '+%Y-%m-%d %H:%M:%S'
+ echo '[2026-08-05 13:25:09] Removing uninstall script'
[2026-08-05 13:25:09] Removing uninstall script
+ rm -f -- /opt/rke2/bin/rke2-uninstall.sh
note
If the script outputs errors (e.g., Cleanup didn't complete successfully), re-run the script or contact Harvester Support.
Verification:
Once the script finishes, verify that RKE2 services and virtual interfaces have been stopped.
Check process termination:
harv21:/home/rancher # ps aux | grep kubelet
# Expected output: Only the grep process itself should returnCheck network interfaces:
harv21:/home/rancher # ip link
# Expected output: Only physical interfaces and management bridges remain active
# no output like `56: cali05b22ce82b3@if2:`Check Harvester UI.
The host
harv21displays a red Maintenance status with the warning messageKubelet stopped posting node status.
Remove the Node Object
To complete the node removal from the cluster, you must explicitly delete the Kubernetes node object using one of the following methods:
Option A: Via Harvester UI (Recommended)
Navigate to the Hosts page in the Harvester UI.
Locate the target node (
harv21).Select ⋮ > Delete.
Option B: Via kubectl CLI
Verify the current node list:
kubectl get nodesDelete the
nodeobject:kubectl delete node harv21Confirm that
harv21is no longer listed in the cluster.
note
If the deleted node still appears as a stale entry record in the Harvester UI, force refresh your browser page (Ctrl+F5 or Cmd+Shift+R) to reload the Hosts list.

Known Issue 1: Node stuck in "Draining" state during removal
Symptom
During node deletion, the host status on the UI normally shows Kubelet stopped posting node status.

If the UI displays Node is draining due to kubelet/node not ready, or toggles between Kubelet stopped posting node status and Node is draining due to kubelet/node not ready for more than 5 minutes without removing the host, you have encountered a known issue. Refer to the Node Draining Workaround Guide for resolution steps.

Known Issue 2: Longhorn node resource persists after host removal
Symptom
After a node is removed from the Harvester cluster, its corresponding Longhorn node resource (nodes.longhorn.io) may persist in the longhorn-system namespace.
When you attempt to manually delete the resource, the Longhorn admission webhook blocks the deletion with an error:
$ kubectl get nodes.longhorn -n longhorn-system
NAMESPACE         NAME     READY   ALLOWSCHEDULING   SCHEDULABLE   AGE
longhorn-system   harv21   False   true              False         13d
longhorn-system   harv31   True    true              True          13d

$ kubectl delete nodes.longhorn -n longhorn-system harv21
The request is invalid: : could not delete node harv21 with node ready condition is False, reason is KubernetesNodeGone, node schedulable true, and 0 replica, 0 engine running on it
Attempts to force-delete the object by manually removing its finalizers (metadata.finalizers)` will also fail, as the admission webhook continues to intercept and reject the update request.
Furthermore, if you re-add the host to the cluster using the same node name while this stale object remains, Longhorn may report that the node's disks are not ready or fail to provision storage pools for the newly added node.
Cause
Longhorn's validation webhook prevents node resource deletion while allowScheduling is set to true (even if the underlying Kubernetes node is gone and no replicas or engines are running on it).
Workaround
Disable scheduling on the stale Longhorn node by setting allowScheduling to false:
$ kubectl patch nodes.longhorn.io harv21 -n longhorn-system --type=merge -p '{"spec":{"allowScheduling":false}}'Delete the Longhorn node resource:
$ kubectl delete nodes.longhorn.io harv21 -n longhorn-system
Post-Removal Disk Cleanup
The uninstallation script tears down container runtimes and Kubernetes configurations, but it does not wipe local storage drives or bootloader partitions.
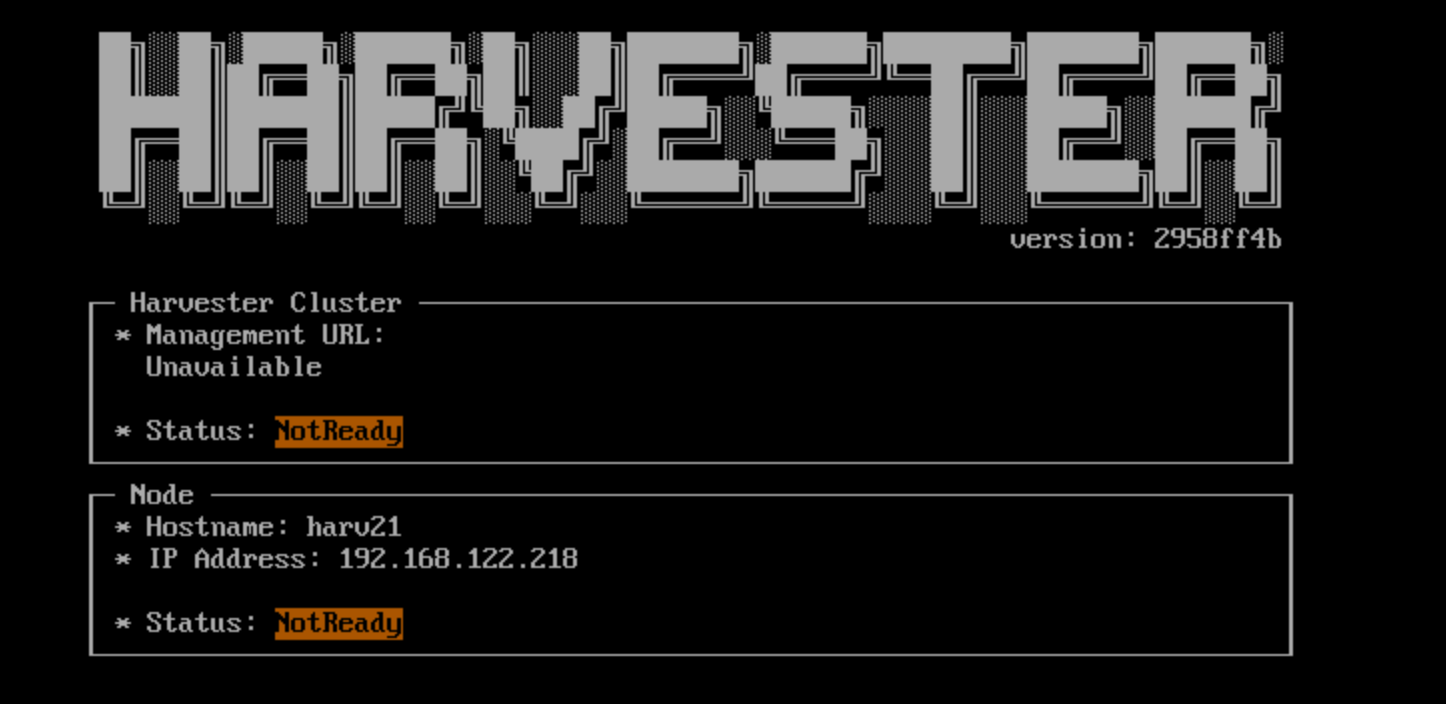
If harv21 is rebooted without disk formatting, it will load leftover installation data locally (as shown on its physical or virtual console below). However, this is strictly a local artifact—the Harvester cluster is not affected by it.
warning
To prevent residual storage conflicts (such as stale Longhorn volume metadata) or unexpected data leakage when hardware is repurposed:
Hand Off to Infrastructure / Storage Admins: Forward the decommissioned host to your IT infrastructure or system administration team to perform drive sanitization according to your organization's data retention and hardware lifecycle policies.
OS Drive Safety: Avoid attempting to run raw disk-wiping utilities (such as
wipefsordd) on the active OS root disk while booted into the system, as destroying mounted filesystems will cause immediate kernel panics and data corruption.Re-imaging:
If the node is being re-added to a Harvester cluster, the target OS drive can be safely wiped and reformatted directly via the Harvester installer ISO during the standard boot setup.