
2 posts tagged with "cluster"

View All Tags

· 11 min read
Jian Wang
warning
  1. Documentation Reference: Review the official Harvester Deleting a Node Documentation for critical prerequisites and safety considerations.

  2. Strict Execution Sequence: All steps in this document must be executed in strict numerical sequence. If any step encounters an error or produces unexpected output, stop immediately and consult Harvester support or your cluster administration team before proceeding.

Cluster Baseline

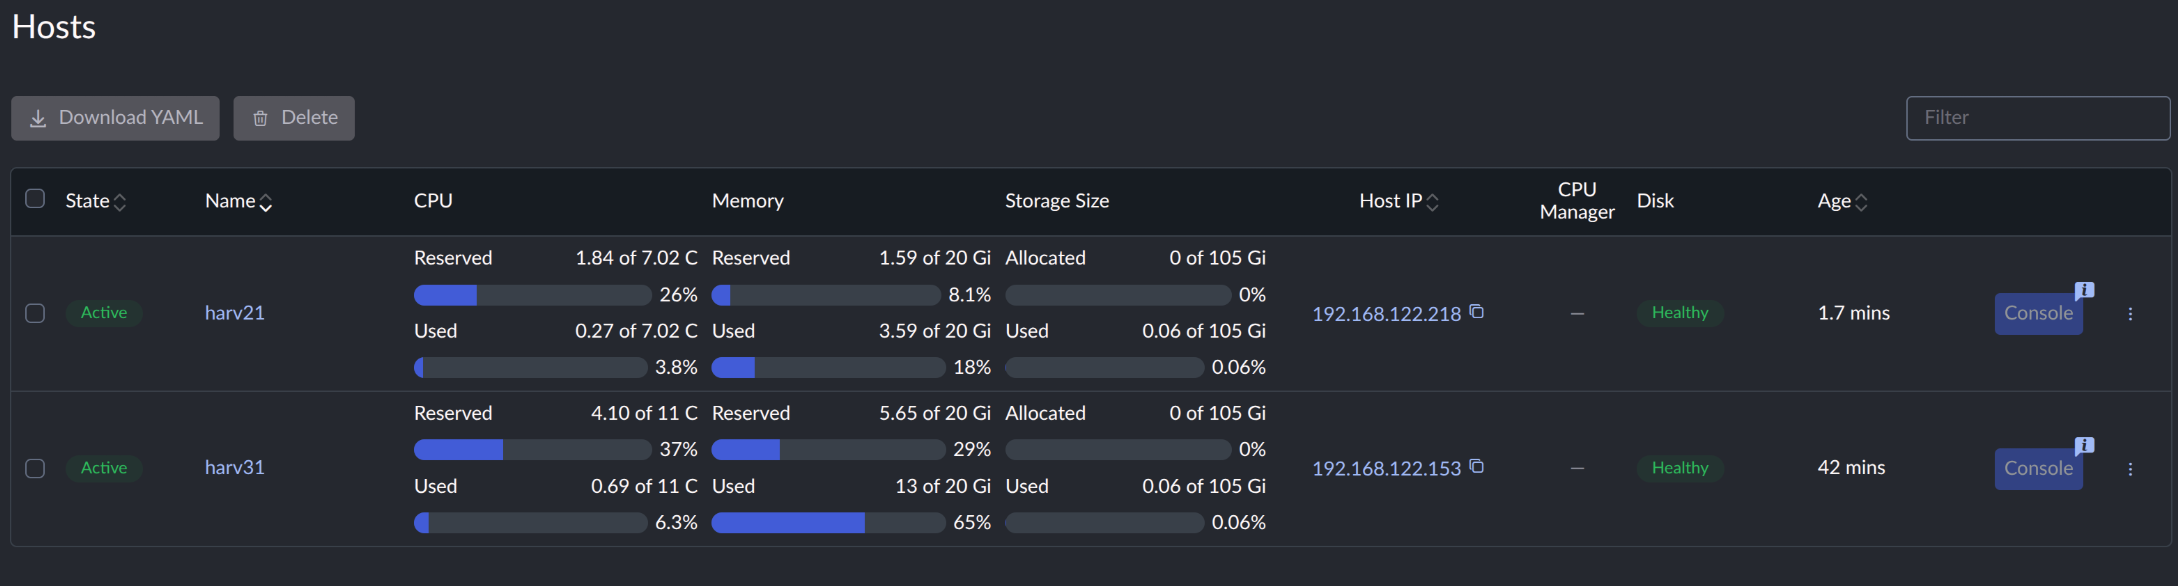
Before initiating any node removal, verify that the cluster state is healthy and that all active Kubernetes node objects align 1:1 with their corresponding Cluster API machine objects. If any stale or redundant machine objects exist from previous failed deployments, delete them before proceeding.

The sample cluster has two nodes, and worker node harv21 will be removed.
node-warning

harv31:/home/rancher # kubectl get nodes -A
NAME STATUS ROLES AGE VERSION
harv21 Ready <none> 15m v1.36.3+rke2r1
harv31 Ready control-plane,etcd 56m v1.36.3+rke2r1

harv31:/home/rancher # kubectl get machines -A
NAMESPACE NAME CLUSTER NODE NAME FAILURE DOMAIN READY AVAILABLE UP-TO-DATE PHASE AGE VERSION
fleet-local custom-2b108e6cb5d9 local harv21 True True Running 15m
fleet-local custom-d9d1ba8f7563 local harv31 True True Running 51m
important

2-Node Cluster: In this 2-node sample environment (harv21 + harv31), harv31 is the sole control-plane and etcd node. You CANNOT delete harv31. Removing the only control-plane node will instantly collapse the Kubernetes API server and permanently break cluster quorum. In a 2-node setup, only worker nodes (like harv21) can be safely decommissioned.

Single-Node Cluster: Needless to say, you cannot delete the only node from a single-node cluster. Removing the node destroys the entire cluster control plane and storage layer simultaneously.

Removing a Control-Plane Node in 3+ Node Clusters

If your cluster has 3 or more control-plane nodes (e.g., a High-Availability setup with harv11, harv21, harv31), deleting a control-plane node is supported, but extra precautions apply:

  • Quorum Health: etcd requires a strict majority to maintain quorum ($N/2 + 1$). Ensure the remaining control-plane count after removal will form an odd number (or maintain quorum requirements) before taking a node down.

  • Proactive etcd Leadership Transfer: If the control-plane node scheduled for removal currently holds the active etcd leader role, you MUST explicitly transfer leadership to a surviving control node before executing uninstallation scripts.

Control Plane & ETCD Leadership Transfer (Control-Plane Nodes Only)

warning

Do not rely on automatic etcd election timeouts when taking down a control-plane node. Terminating the active etcd leader without prior transfer causes a temporary control-plane freeze while remaining nodes wait for election timeouts. Proactively transferring leadership guarantees zero API server disruption.

If the target node to be removed holds the control-plane / etcd role, perform leadership verification and manual handover before draining or uninstalling software.

  1. Check Current ETCD Leadership

    Log in to any active control-plane node and query the member list inside the static etcd pod:

    harv31:/home/rancher # ETCDCTL_API=3 kubectl exec -n kube-system etcd-harv31 -- etcdctl \
    --cacert=/var/lib/rancher/rke2/server/tls/etcd/server-ca.crt \
    --cert=/var/lib/rancher/rke2/server/tls/etcd/server-client.crt \
    --key=/var/lib/rancher/rke2/server/tls/etcd/server-client.key \
    endpoint status --cluster -w table

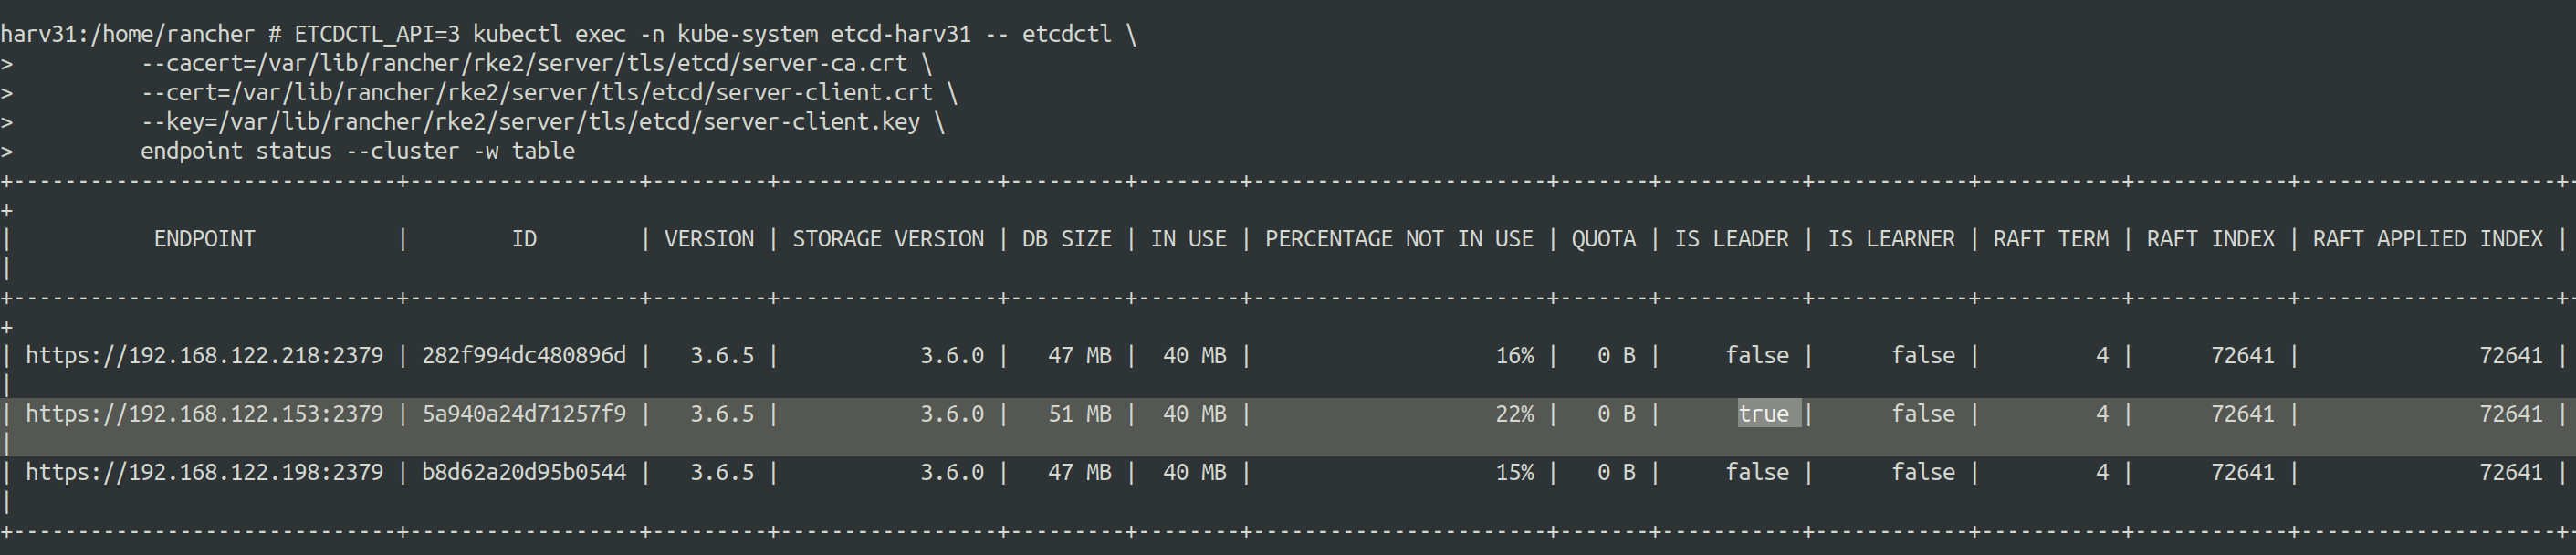
    The following example output displays the endpoint status for a three-node control plane cluster:
    etcd-endpoint-status

    Locate the target node by its IP address in the ENDPOINT column and evaluate the following:

    • If the target control-plane node has IS LEADER set to false, proceed directly to Prepare the Target Node.

    • If the target control-plane node has IS LEADER set to true, proceed next step to transfer leadership.

  2. Proactively Move ETCD Leadership

    1. Select a surviving member node from the endpoint status --cluster table that has IS LEADER set to false and IS LEARNER set to false. Record its hexadecimal ID.

    2. Transfer leadership away from the target host to the surviving member ID:

      harv31:/home/rancher # ETCDCTL_API=3 kubectl exec -n kube-system etcd-harv31 -- etcdctl \
      --cacert=/var/lib/rancher/rke2/server/tls/etcd/server-ca.crt \
      --cert=/var/lib/rancher/rke2/server/tls/etcd/server-client.crt \
      --key=/var/lib/rancher/rke2/server/tls/etcd/server-client.key \
      move-leader <TARGET_SURVIVING_MEMBER_ID>
    3. Re-run endpoint status --cluster -w table to confirm that IS LEADER has successfully shifted to the surviving node before proceeding.

Prepare the Target Node

Check the official Harvester Deleting a Node Documentation steps before 5. Evict workloads from the node to be removed.

important

Before cordoning or draining the node, backup/export any critical diagnostic data, custom host configs or persistent host path data to a secure remote host. Once workloads are evicted or the node is uninstalled, local ephemeral data and pod logs might no longer be accessible.

Whenever possible, enable Maintenance mode on the target node directly from the Harvester UI via Hosts > Action > Enable Maintenance Mode.

If UI maintenance mode is not accessible/not allowed, prepare the node manually using kubectl

# Cordon the target node to prevent new pod scheduling
kubectl cordon harv21

# Verify that the node status reflects 'SchedulingDisabled'
kubectl get node harv21

# Drain active workloads and local data storage from the node
kubectl drain harv21 --ignore-daemonsets --delete-emptydir-data

Verify Post-Maintenance Cluster Health

Once the target node successfully enters Maintenance Mode (or completes its kubectl drain cycle), do not proceed directly to node uninstallation. Workload migration places extra CPU, memory, network, and disk I/O pressure on surviving nodes. You must verify that the cluster has stabilized before taking irreversible deletion steps.

Perform the following system-level checks on an active control-plane node:

  1. Node Readiness & Resource Overhead: Verify that all remaining nodes report Ready and have sufficient CPU and memory headroom to handle the re-located workloads:

    harv31:/home/rancher # kubectl get nodes
    harv31:/home/rancher # kubectl top nodes
  2. Pod & Workload Status: Ensure no evicted pods or virtual machine instances are stuck in Pending, CrashLoopBackOff, or unschedulable states:

    harv31:/home/rancher # kubectl get pods -A | grep -v -E 'Running|Completed'
  3. Abnormal Cluster Events: Check for recent scheduling warnings, resource exhaustion alerts, or failed volume mounts triggered by the eviction:

    harv31:/home/rancher # kubectl get events -A --field-selector type=Warning --sort-by='.metadata.creationTimestamp'
  4. Longhorn Storage Health or Third-Party Storage: In the Harvester UI (or Longhorn dashboard / third-party storage management console), verify that all storage volume replicas have finished rebuilding across the remaining hosts and that no volumes remain degraded, degraded-syncing, or in a Faulted state.

  5. Critical System Services & Business Workloads: Confirm that core cluster add-ons and critical business applications have successfully re-established quorum and connectivity:

    • Core Infrastructure: Verify that ingress controllers, CNI networking components (e.g., Canal/Flannel/Cilium), and monitoring stacks are fully functional across surviving nodes.
    • VIP / Ingress Traffic: Ensure VIP services or external load balancer targets have updated and are actively serving production traffic without packet drop or high latency.
    • Stateful Workloads: Validate that stateful applications (e.g., databases, message queues, key-value stores) have re-attached their persistent volumes and recovered cluster synchronization.
  6. VM Auto-Balance & Migration Thrashing Check: If the Virtual Machine Auto-Balance addon is enabled, monitor active migrations in the Harvester UI. Pay close attention to ensure that workload shifts do not trigger cascading, hyper-frequent VM re-balancing migrations across the remaining hosts due to tight CPU/memory thresholds.

  7. Observation & Stability Window: Allow an observation window (e.g., 30 minutes) before initiating permanent node uninstallation or deletion. Monitor real-time metrics, node load averages, and VM responsiveness to guarantee cluster stability under sustained operational load.

warning

STOP / GO GATE:

If the cluster exhibits degraded storage, abnormal pods, or resource saturation following workload eviction, stop immediately. Fix and recover cluster health before deleting machine or node objects.

Execute Node Uninstallation Script

warning
  1. Target Node Only (harv21): The uninstall script /opt/rke2/bin/rke2-uninstall.sh MUST ONLY BE RUN DIRECTLY ON THE TARGET NODE BEING REMOVED (harv21). Running this on harv31 or another active control node will destroy that node's local cluster services.

  2. Immediate Destruction (No Confirmation Prompt): The uninstall script /opt/rke2/bin/rke2-uninstall.sh does NOT ask for double confirmation or prompt y/n before execution. Once invoked, it immediately stops services and tears down the node environment. Double-check your active hostname (hostname) before pressing Enter.

Log in to harv21 via SSH/console as the root user and execute the pre-installed script:

harv21:/home/rancher # hostname
harv21

harv21:/home/rancher # /opt/rke2/bin/rke2-uninstall.sh
++ id -u
...
...
...
+ echo -e '\e[31mCleanup didn'\''t complete successfully\e[0m'
Cleanup didn't complete successfully
+ log 'Removing uninstall script'
++ date '+%Y-%m-%d %H:%M:%S'
+ echo '[2026-08-05 13:25:09] Removing uninstall script'
[2026-08-05 13:25:09] Removing uninstall script
+ rm -f -- /opt/rke2/bin/rke2-uninstall.sh

note

If the script outputs errors (e.g., Cleanup didn't complete successfully), re-run the script or contact Harvester Support.

Verification:

Once the script finishes, verify that RKE2 services and virtual interfaces have been stopped.

  1. Check process termination:

    harv21:/home/rancher # ps aux | grep kubelet
    # Expected output: Only the grep process itself should return
  2. Check network interfaces:

    harv21:/home/rancher # ip link
    # Expected output: Only physical interfaces and management bridges remain active
    # no output like `56: cali05b22ce82b3@if2:`
  3. Check Harvester UI.

    The host harv21 displays a red Maintenance status with the warning message Kubelet stopped posting node status.

Remove the Node Object

To complete the node removal from the cluster, you must explicitly delete the Kubernetes node object using one of the following methods:

Option A: Via Harvester UI (Recommended)

  1. Navigate to the Hosts page in the Harvester UI.

  2. Locate the target node (harv21).

  3. Select ⋮ > Delete.

Option B: Via kubectl CLI

  1. Verify the current node list:

    kubectl get nodes
  2. Delete the node object:

    kubectl delete node harv21
  3. Confirm that harv21 is no longer listed in the cluster.

note

If the deleted node still appears as a stale entry record in the Harvester UI, force refresh your browser page (Ctrl+F5 or Cmd+Shift+R) to reload the Hosts list.

new-cluster-ready

Known Issue 1: Node stuck in "Draining" state during removal

Symptom

During node deletion, the host status on the UI normally shows Kubelet stopped posting node status.

node-removal-normally-uninstalled

If the UI displays Node is draining due to kubelet/node not ready, or toggles between Kubelet stopped posting node status and Node is draining due to kubelet/node not ready for more than 5 minutes without removing the host, you have encountered a known issue. Refer to the Node Draining Workaround Guide for resolution steps.

node-removal-node-draining

Known Issue 2: Longhorn node resource persists after host removal

Symptom

After a node is removed from the Harvester cluster, its corresponding Longhorn node resource (nodes.longhorn.io) may persist in the longhorn-system namespace.

When you attempt to manually delete the resource, the Longhorn admission webhook blocks the deletion with an error:

$ kubectl get nodes.longhorn -n longhorn-system
NAMESPACE NAME READY ALLOWSCHEDULING SCHEDULABLE AGE
longhorn-system harv21 False true False 13d
longhorn-system harv31 True true True 13d

$ kubectl delete nodes.longhorn -n longhorn-system harv21
The request is invalid: : could not delete node harv21 with node ready condition is False, reason is KubernetesNodeGone, node schedulable true, and 0 replica, 0 engine running on it

Attempts to force-delete the object by manually removing its finalizers (metadata.finalizers)` will also fail, as the admission webhook continues to intercept and reject the update request.

Furthermore, if you re-add the host to the cluster using the same node name while this stale object remains, Longhorn may report that the node's disks are not ready or fail to provision storage pools for the newly added node.

Cause

Longhorn's validation webhook prevents node resource deletion while allowScheduling is set to true (even if the underlying Kubernetes node is gone and no replicas or engines are running on it).

Workaround

  1. Disable scheduling on the stale Longhorn node by setting allowScheduling to false:

    $ kubectl patch nodes.longhorn.io harv21 -n longhorn-system --type=merge -p '{"spec":{"allowScheduling":false}}'
  2. Delete the Longhorn node resource:

    $ kubectl delete nodes.longhorn.io harv21 -n longhorn-system

Post-Removal Disk Cleanup

The uninstallation script tears down container runtimes and Kubernetes configurations, but it does not wipe local storage drives or bootloader partitions.

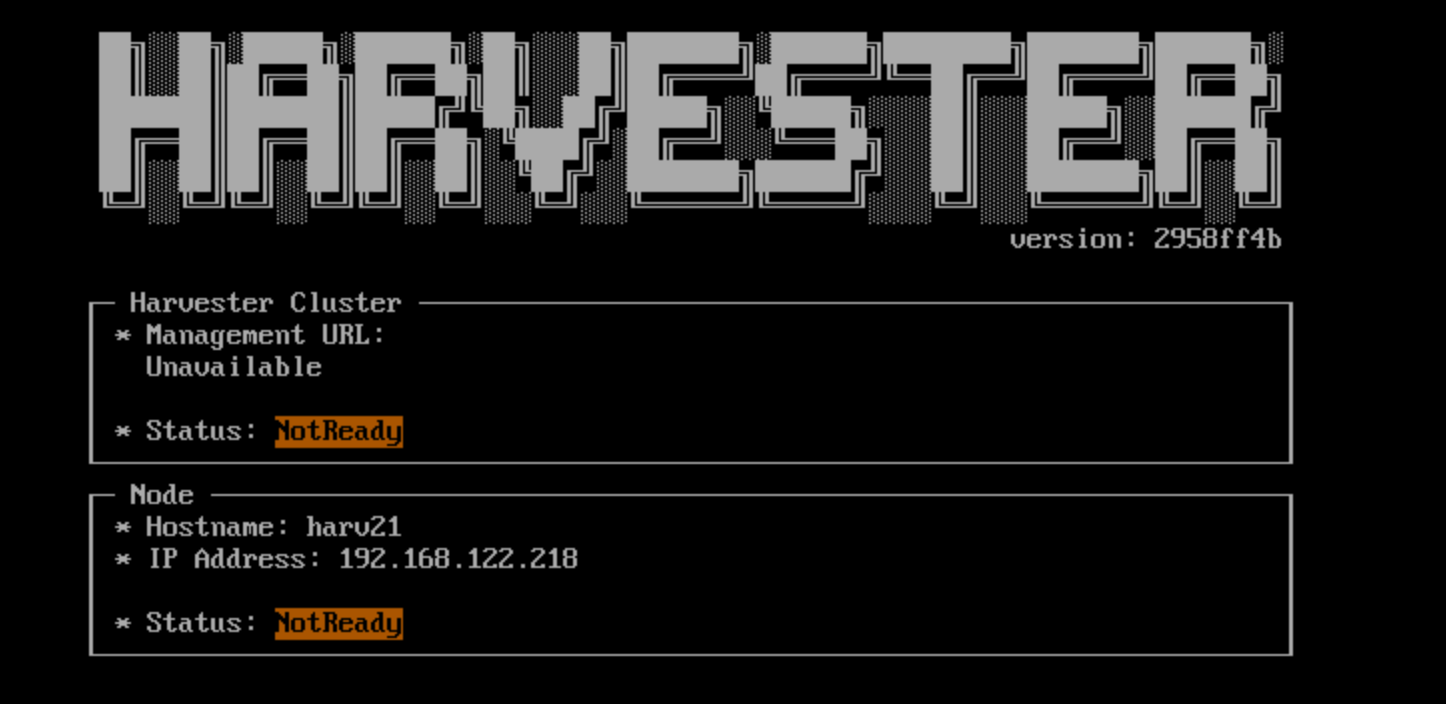
If harv21 is rebooted without disk formatting, it will load leftover installation data locally (as shown on its physical or virtual console below). However, this is strictly a local artifact—the Harvester cluster is not affected by it.
standalone-leftover

warning

To prevent residual storage conflicts (such as stale Longhorn volume metadata) or unexpected data leakage when hardware is repurposed:

  1. Hand Off to Infrastructure / Storage Admins: Forward the decommissioned host to your IT infrastructure or system administration team to perform drive sanitization according to your organization's data retention and hardware lifecycle policies.

  2. OS Drive Safety: Avoid attempting to run raw disk-wiping utilities (such as wipefs or dd) on the active OS root disk while booted into the system, as destroying mounted filesystems will cause immediate kernel panics and data corruption.

  3. Re-imaging:

    If the node is being re-added to a Harvester cluster, the target OS drive can be safely wiped and reformatted directly via the Harvester installer ISO during the standard boot setup.

· 19 min read
Jian Wang

Scenarios:

  1. The Harvester cluster is installed with 3+ nodes.

  2. The Rancher Manager/Server is deployed independently. (Hereafter it is mentioned as Rancher Manager)

  3. The Harvester cluster is imported to this Rancher Manager and works as a node driver.

  4. The Rancher Manager deploys a couple of downstream K8s clusters, the machines/nodes of those clusters are backed by Harvester VMs.

  5. There are also some traditional VMs deployed on the Harvester cluster, which have no direct connection with the Rancher Manager.

You plan to move those Harvester nodes geographically, or to power off the whole cluster for some time, it is essential to shutdown the Harvester cluster and restart later.

note

2 3 4 are optional if your Harvester cluster is mainly running as an IaaS component. This instruction covers all the above scenarios.

General Principle

To safely shutdown a Harvester cluster, you need to follow the roughly reverse order of the cluster installation and the workload deployments.

Those facts need to be taken into account particularly:

  1. The common methodology of Kubernetes operator/controller is to try things continuously until they meet expectations. When the cluster is shutting down node by node, if you don't stop those workloads in advance, they will try hard until the last node is off. It causes the last few nodes to have heavy CPU/memory/network/storage usage and increases the chance of data corruption.

  2. Each Harvester node has limited capacity of CPU/memory/network/storage and the max-pod-number, when all workloads are crowded on the last few nodes, the unexpected pod eviction, scheduling failure and other phenomena may happen.

  3. Harvester has embedded Longhorn as the default CSI driver, each PV can have 3 or more replicas, when replicas are rescheduled to other nodes, Longhorn will copy data from source node and rebuild the replica. Undoubtedly, stop the PVs as much as possible before the cluster shutdown to avoid the data moving.

  4. Unlike normal Kubernetes deployments which have no PVs and are more flexible & agile to deploy anywhere on the cluster, the VMs are backed by massive sized PVs, slowly to move/migrate or even pinned on certain nodes to take the advantage of PCI-passthrough/vGPU/... and are much more sensitive to data consistency.

Needless to say, it is a bad practice to brutally power off the nodes on production environments.

1. Precondition

1.1 Generate a Support-bundle File

For trouble-shooting purpose, it is essential to follow this instruction to generate a support-bundle file before taking any actions. And make sure the workload namespaces are added.

1.2 Keep Network Stability

important

Harvester cluster is built on top of Kubernetes, a general requirement is that the Node/Host IP and the cluster VIP should keep stable in the whole lifecycle, if IP changes the cluster may fail to recover/work.

If your VMs on Harvester are used as Rancher downstream cluster machines/nodes, and their IPs are allocated from DHCP server, also make sure those VMs will still get the same IPs after the Harvester cluster is rebooted and VMs are restarted.

A good practice is to have detailed documents about the infrastructure related settings.

  • The bare metal server NIC slot/port connections with the remote (ToR) Switches.

  • The VLAN for the management network.

  • (Optional) The DHCP Server, ip-pools and ip-mac bindings for the Harvester cluster if DHCP server is used. If there is no fixed IP binding, when the server restarts after some days it may get a different IP from the DHCP server.

  • The VLANs for the VM networks, the CIDRs, default gateways and optional DHCP servers.

  • NTP servers.

  • DNS servers.

  • (Optional) The http proxy.

  • (Optional) The private containerd-registry.

  • (Optional) The firewall configurations.

See the Harvester ISO Installation to review the infrastructure related settings for the Harvester cluster.

Before the Harvester cluster is restarted later, check and test those settings again to make sure the infrastructure is ready.

2. Backup

(Optional) Backup VMs if Possible

It is always a good practice to backup things before a whole cluster shutdown.

(Optional) Backup Downstream K8s Clusters if Possible

Harvester doesn't touch the (Rancher Manager managed) downstream K8s clusters' workload, when they are not able to be migrated to other node drivers, suggests to backup those clusters.

(Optional) Stop or Migrate Downstream K8s Clusters if Possible

Harvester doesn't touch the downstream K8s clusters' workload, but suggests to stop or migrate the downstream clusters to avoid your service interruption.

3. Shutdown Workloads

3.1 Shutdown Traditional VMs

  1. Shutdown VM from the VM shell (e.g. Linux shutdown command), the OS itself will save data to disks.

  2. Check the VM status from Harvester UI - VM page, when it is not Off, then click the Stop command.

3.2 Shutdown Rancher Downstream Cluster Machines(VMs)

Suppose your Harvester cluster was imported to Rancher as a node driver before.

When Rancher deploys a downstream cluster on node driver Harvester, it creates a couple of VMs on Harvester automatically. Directly stopping those VMs on Harvester is not a good practice when Rancher is still managing the downstream cluster. For example, Rancher may create new VMs if you stop them from Harvester.

note

This depends on the auto-replace and/or other options on Rancher Manager.

If you have got a solution to shutdown those downstream clusters, and check those VMs are Off; or there is no downstream clusters, then jump to the step disable some addons.

Unless you have already deleted all the downstream clusters which are deploy on this Harvester, DO NOT remove this imported Harvester from the Rancher Manager. Harvester will get a different driver-id when it is imported later, but those aforementioned downstream clusters are connected to driver-id.

To safely shutdown those VMs but still keep the Rancher Manager managed downstream cluster alive, please follow the steps below:

Disconnect Harvester from the Rancher Manager

Rancher and Harvester relationship

note

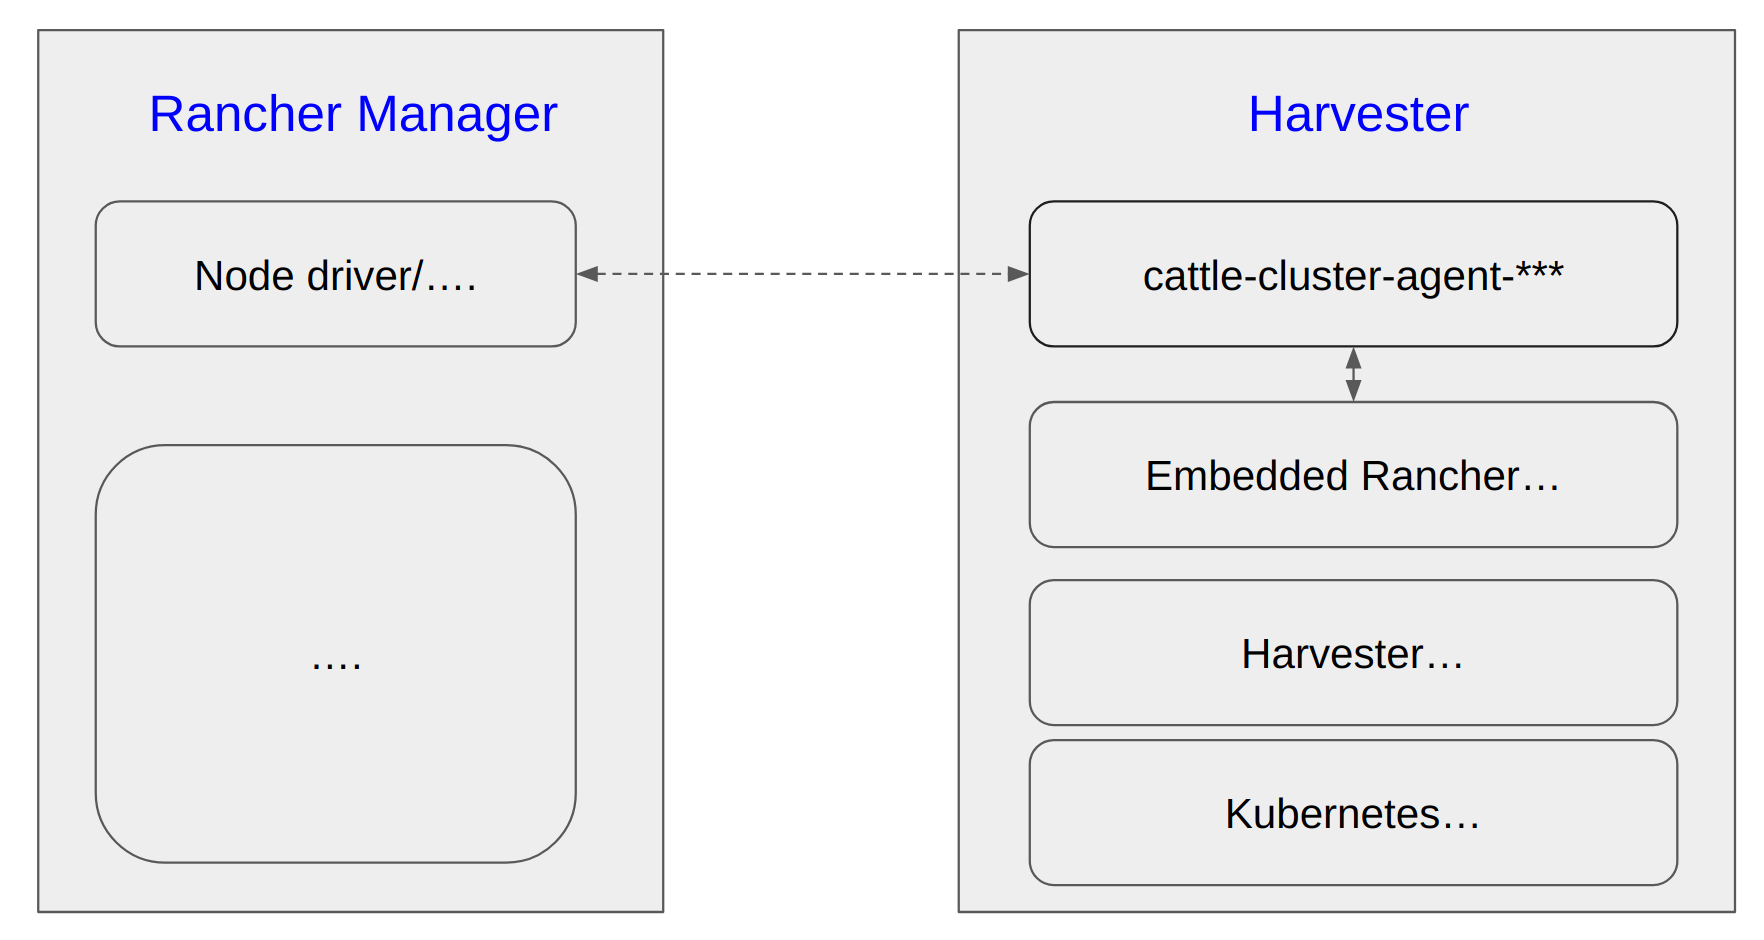
Harvester has an embedded Rancher deployment which is used to help the lifecycle management of Harvester itself, it is different from the independently deployed Rancher Manager for multi-cluster management and more.

The cattle-cluster-agent-*** pod is the direct connection between Rancher Manager and Harvester cluster, and this pod is monitored and managed by the embedded Rancher in Harvester, scaling down this pod does not work. The embedded Rancher will scale it up automatically.

Run steps below to suspend the connection.

All following CLI commands are executed upon Harvester cluster.

  1. Set the management.cattle.io/scale-available of deployment rancher to be "" instead of "3" or other values.

This change will stop the auto-scaling.

harvester$ kubectl edit deployment -n cattle-system rancher
apiVersion: apps/v1
kind: Deployment
metadata:
annotations:
...
management.cattle.io/scale-available: "3" // record this value, and change it to ""
...
generation: 16
labels:
app: rancher
app.kubernetes.io/managed-by: Helm
...
name: rancher
namespace: cattle-system
  1. Scale down the rancher deployment.
harvester$ kubectl scale deployment -n cattle-system rancher --replicas=0
deployment.apps/rancher scaled


harvester$ get deployment -n cattle-system rancher
NAME READY UP-TO-DATE AVAILABLE AGE
rancher 0/0 0 0 33d
  1. Make sure the rancher-* pods are gone.

Check the rancher-* pods on cattle-system are gone, if any of them is stucking at Terminating, use kubectl delete pod -n cattle-system rancher-pod-name --force to delete it.

harvester$ kubectl get pods -n cattle-system
NAME READY STATUS RESTARTS AGE
..
rancher-856f674f7d-5dqb6 0/1 Terminating 0 3d22h
rancher-856f674f7d-h4vsw 1/1 Running 23 (68m ago) 33d
rancher-856f674f7d-m6s4r 0/1 Pending 0 3d19h
...
  1. Scale down the cattle-cluster-agent deployment.
harvester$ kubectl scale deployment -n cattle-system cattle-cluster-agent --replicas=0
deployment.apps/cattle-cluster-agent scaled


harvester$ kubectl get deployment -n cattle-system
NAME READY UP-TO-DATE AVAILABLE AGE
cattle-cluster-agent 0/0 0 0 23d

Please note:

  1. From now on, this Harvester is Unavailable on the Rancher Manager.

Unavailable

  1. The Harvester WebUI returns 503 Service Temporarily Unavailable, all operations below can be done via kubectl.

503 Service Temporarily Unavailable

Shutdown Rancher Downstream Cluster Machines(VMs)

  1. Shutdown VM from the VM shell (e.g. Linux shutdown command).

  2. Check the vmi instances, if any is still Running, stop it.

harvester$ kubectl get vmi
NAMESPACE NAME AGE PHASE IP NODENAME READY
default vm1 5m6s Running 10.52.0.214 harv41 True


harvester$ virtctl stop vm1 --namespace default
VM vm1 was scheduled to stop

harvester$ kubectl get vmi -A
NAMESPACE NAME AGE PHASE IP NODENAME READY
default vm1 5m6s Running 10.52.0.214 harv41 False


harvester$ kubectl get vmi -A
No resources found

harvester$ kubectl get vm -A
NAMESPACE NAME AGE STATUS READY
default vm1 7d Stopped False

3.3 Disable Some Addons

Harvester has some addons which are backed by PVCs, it is necessary to disable them.

The rancher-monitoring addon should be disabled.

The experimental Rancher Manager addon should be disabled.

For other addons, please follow the Harvester document to keep or disable them.

From Harvester UI addon page, write down those none-Disabled addons, click Disable menu to disable them, wait until the state becomes Disabled

From CLI:

$ kubectl get addons.harvesterhci.io -A

NAMESPACE NAME HELMREPO CHARTNAME ENABLED
cattle-logging-system rancher-logging http://harvester-cluster-repo.cattle-system.svc/charts rancher-logging false
cattle-monitoring-system rancher-monitoring http://harvester-cluster-repo.cattle-system.svc/charts rancher-monitoring true
harvester-system harvester-seeder http://harvester-cluster-repo.cattle-system.svc/charts harvester-seeder false
harvester-system nvidia-driver-toolkit http://harvester-cluster-repo.cattle-system.svc/charts nvidia-driver-runtime false
harvester-system pcidevices-controller http://harvester-cluster-repo.cattle-system.svc/charts harvester-pcidevices-controller false
harvester-system vm-import-controller http://harvester-cluster-repo.cattle-system.svc/charts harvester-vm-import-controller false

Example: disable rancher-monitoring

$ kubectl edit addons.harvesterhci.io -n cattle-monitoring-system rancher-monitoring

...
spec:
chart: rancher-monitoring
enabled: false // set this field to be false
...

note

When an addon is disabled, the configuration data is stored to reuse when the addon is enabled again.

3.4 (Optional) Disable other Workloads

If you have deployed some customized workloads on the Harvester cluster directly, it is better to disable/remove them.

3.5 Check Longhorn Volumes

The volumes should be in state detached, check the related workload if some volumes are still in state attached.

harvester$ kubectl get volume -A
NAMESPACE NAME DATA ENGINE STATE ROBUSTNESS SCHEDULED SIZE NODE AGE
longhorn-system pvc-3323944c-00d9-4b35-ae38-a00b1e8a8841 v1 detached unknown 5368709120 13d
longhorn-system pvc-394713a4-d08c-4a45-bf7a-d44343f29dea v1 attached healthy 6442450944 harv41 8d // still attached and in use
longhorn-system pvc-5cf00ae2-e85e-413e-a4f1-8bc4242d4584 v1 detached unknown 2147483648 13d
longhorn-system pvc-620358ca-94b3-4bd4-b008-5c144fd815c9 v1 attached healthy 2147483648 harv41 8d // still attached and in use
longhorn-system pvc-8174f05c-919b-4a8b-b1ad-4fc110c5e2bf v1 detached unknown 10737418240 13d

4. Shutdown Nodes

Get all nodes from Harvester WebUI Host Management.

From CLI:

harvester$ kubectl get nodes -A
NAME STATUS ROLES AGE VERSION
harv2 Ready <none> 24d v1.27.10+rke2r1 // worker node
harv41 Ready control-plane,etcd,master 54d v1.27.10+rke2r1 // control-plane node
harv42 Ready control-plane,etcd,master 54d v1.27.10+rke2r1 // control-plane node
harv43 Ready control-plane,etcd,master 54d v1.27.10+rke2r1 // control-plane node

4.1 Shutdown the Worker Nodes

  1. SSH to the Harvester worker nodes.

  2. Run command sudo -i shutdown.

$ sudo -i shutdown

Shutdown scheduled for Mon 2024-07-22 06:58:56 UTC, use 'shutdown -c' to cancel.
  1. Wait until all those nodes are down.

4.2 Shutdown Control-plane Nodes and Witness Node

So far, there are generally three control-plane nodes left, and three etcd-* pods are running in kube-system namespaces.

The first step is to find which one of the etcd-* pod is running as the leader.

Run below command upon any of the etcd-* pod, note the IS LEADER column.

$ kubectl exec -n kube-system etcd-harv41 -- env ETCDCTL_API=3 etcdctl endpoint status --cluster -w table --cacert /var/lib/rancher/rke2/server/tls/etcd/server-ca.crt --cert /var/lib/rancher/rke2/server/tls/etcd/server-client.crt --key /var/lib/rancher/rke2/server/tls/etcd/server-client.key

+------------------------------+------------------+---------+---------+-----------+------------+-----------+------------+--------------------+--------+
| ENDPOINT | ID | VERSION | DB SIZE | IS LEADER | IS LEARNER | RAFT TERM | RAFT INDEX | RAFT APPLIED INDEX | ERRORS |
+------------------------------+------------------+---------+---------+-----------+------------+-----------+------------+--------------------+--------+
| https://192.168.122.141:2379 | c70780b7862269c9 | 3.5.9 | 34 MB | true | false | 45 | 6538756 | 6538756 | |
| https://192.168.122.142:2379 | db04095b49eb5352 | 3.5.9 | 34 MB | false | true | 45 | 6538756 | 6538756 | |
| https://192.168.122.143:2379 | c27585769b2ce977 | 3.5.9 | 34 MB | false | true | 45 | 6538756 | 6538756 | |
+------------------------------+------------------+---------+---------+-----------+------------+-----------+------------+--------------------+--------+

Witness Node

If your cluster has one Witness Node and the etcd leader happens to be on this node.

harvester$ kubectl get nodes -A
NAME STATUS ROLES AGE VERSION
harv2 Ready <none> 25d v1.27.10+rke2r1 // worker node
harv41 Ready control-plane,etcd,master 55d v1.27.10+rke2r1 // control-plane node
harv42 Ready control-plane,etcd,master 55d v1.27.10+rke2r1 // control-plane node
harv43 Ready etcd 1d v1.27.10+rke2r1 // witness node

+------------------------------+------------------+---------+---------+-----------+------------+-----------+------------+--------------------+--------+
| ENDPOINT | ID | VERSION | DB SIZE | IS LEADER | IS LEARNER | RAFT TERM | RAFT INDEX | RAFT APPLIED INDEX | ERRORS |
+------------------------------+------------------+---------+---------+-----------+------------+-----------+------------+--------------------+--------+
| https://192.168.122.141:2379 | c70780b7862269c9 | 3.5.9 | 34 MB | false | true | 46 | 6538829 | 6538829 | |
| https://192.168.122.142:2379 | db04095b49eb5352 | 3.5.9 | 34 MB | false | true | 46 | 6538829 | 6538829 | |
| https://192.168.122.143:2379 | a21534d02463b347 | 3.5.9 | 34 MB | true | false | 46 | 6538829 | 6538829 | |
+------------------------------+------------------+---------+---------+-----------+------------+-----------+------------+--------------------+--------+

Run kubectl delete pod -n kube-system etcd-name command to delete the etcd pod on the witness node to trigger the pod replacement and leader re-election so that the etcd leader will be located on one of the control-plane nodes. Check the etcd leader again to make sure.

+------------------------------+------------------+---------+---------+-----------+------------+-----------+------------+--------------------+--------+
| ENDPOINT | ID | VERSION | DB SIZE | IS LEADER | IS LEARNER | RAFT TERM | RAFT INDEX | RAFT APPLIED INDEX | ERRORS |
+------------------------------+------------------+---------+---------+-----------+------------+-----------+------------+--------------------+--------+
| https://192.168.122.141:2379 | c70780b7862269c9 | 3.5.9 | 34 MB | true | false | 47 | 6538833 | 6538833 | |
| https://192.168.122.142:2379 | db04095b49eb5352 | 3.5.9 | 34 MB | false | true | 47 | 6538833 | 6538833 | |
| https://192.168.122.143:2379 | a21534d02463b347 | 3.5.9 | 34 MB | false | true | 47 | 6538833 | 6538833 | |
+------------------------------+------------------+---------+---------+-----------+------------+-----------+------------+--------------------+--------+

To now, the etcd has three running instances and the leader is located on the control-plane node.

important

Write down the information of those nodes like name, IP, and the leader. Ideally give them a sequence like 1, 2, 3.

Shutdown the two IS LEADER == false nodes one by one.

harvester-node-shell$ sudo -i shutdown

4.3 Shutdown the Last Control-plane Node

Shutdown the last IS LEADER == true node. Remember its physical information for restarting it first in the steps below.

harvester-last-node-shell$ sudo -i shutdown

5. Restart

If the Harvester cluster has been moved to a new location, or has been off for days, or your infrastructure has changes, check and test the network stability.

5.1 Restart the Control-plane Nodes and the Witness Node

The first step is to start those etcd located nodes one after another.

Restart the Leader Control-plane Node

Power on the last shutdown node first. After about three minutes, continue the next step.

When you check the etcd pod log on this node, the following message may be observed.

sent MsgPreVote request to db04095b49eb5352 at term 5

"msg":"prober detected unhealthy status","round-tripper-name":"ROUND_TRIPPER_RAFT_MESSAGE","remote-peer-id":"db04095b49eb5352","rtt":"0s","error":"dial tcp 192.168.122.142:2380: connect: no route to host"

The etcd is wating for the other two members to be online and then vote a leader.

Restart the Rest of Control-plane Nodes and the Witness Node

Power on the rest nodes which also hosted the etcd pod before.

Wait until all the three control-plane nodes or possibly two control-plane and one witness nodes are Ready.

From CLI:

harvester$ kubectl get nodes -A
NAME STATUS ROLES AGE VERSION
harv41 Ready control-plane,etcd,master 54d v1.27.10+rke2r1
harv42 Ready control-plane,etcd,master 54d v1.27.10+rke2r1
harv43 Ready control-plane,etcd,master 54d v1.27.10+rke2r1

The etcd forms a quorum and can tolerant the failure of one node.

note

If the embedded Rancher was not scaled down before, this step can also be:

Check the Harvester UI is accessible and this node on Harvester UI is Active.

This also applies to the following steps.

Check the VIP

The following EXTERNAL-IP should be the same as the VIP of the Harvester cluster.

harvester$ kubectl get service -n kube-system ingress-expose
NAME TYPE CLUSTER-IP EXTERNAL-IP PORT(S) AGE
ingress-expose LoadBalancer 10.53.50.107 192.168.122.144 443:32701/TCP,80:31480/TCP 34d

5.2 Restart the Worker Nodes

Wait until all nodes are Ready.

From CLI:

harvester$ kubectl get nodes -A
NAME STATUS ROLES AGE VERSION
harv2 Ready <none> 24d v1.27.10+rke2r1 // worker node
harv41 Ready control-plane,etcd,master 54d v1.27.10+rke2r1
harv42 Ready control-plane,etcd,master 54d v1.27.10+rke2r1
harv43 Ready control-plane,etcd,master 54d v1.27.10+rke2r1

Healthy Check

Basic Components

Harvester deploys some basic components on the following namespaces. When a bare-metal server is powered on, it may take upto around 15 minutes for the Harvester OS to be running and all the deployments on this node to be ready.

If any of them continues to show the status like Failed/CrashLoopBackOff, a troubleshooting is needed to confirm the root cause.

NAMESPACE                         NAME                                                     READY   STATUS      RESTARTS       AGE
cattle-fleet-local-system fleet-agent-645766877f-bt424 1/1 Running 0 11m

cattle-fleet-system fleet-controller-57f78dcd48-5tkkj 1/1 Running 4 (14m ago) 42h
cattle-fleet-system gitjob-d5bb7b548-jscgk 1/1 Running 2 (14m ago) 42h

cattle-system harvester-cluster-repo-6c6458bd46-7jcrl 1/1 Running 2 (14m ago) 42h
cattle-system system-upgrade-controller-6f86d6d4df-f8jg7 1/1 Running 2 (14m ago) 42h
cattle-system rancher-7bc9d94b87-g4k4v 1/1 Running 3 (14m ago) 42h // note: if embedded Rancher was stopped in the above steps, it is not Running now
cattle-system rancher-webhook-6c5c6fbb65-2cbbs 1/1 Running 2 (14m ago) 42h

harvester-system harvester-787b467f4-qlfwt 1/1 Running 2 (14m ago) 39h
harvester-system harvester-load-balancer-56d9c8758c-cvcmk 1/1 Running 2 (14m ago) 42h
harvester-system harvester-load-balancer-webhook-6b4d4d9d6b-4tsgl 1/1 Running 2 (14m ago) 42h
harvester-system harvester-network-controller-9pzxh 1/1 Running 2 (14m ago) 42h
harvester-system harvester-network-controller-manager-69bcf67c7f-44zqj 1/1 Running 2 (14m ago) 42h
harvester-system harvester-network-webhook-6c5d48bdf5-8kn9r 1/1 Running 2 (14m ago) 42h
harvester-system harvester-node-disk-manager-c4c5k 1/1 Running 3 (14m ago) 42h
harvester-system harvester-node-manager-qbvbr 1/1 Running 2 (14m ago) 42h
harvester-system harvester-node-manager-webhook-6d8b48f559-m5shk 1/1 Running 2 (14m ago) 42h
harvester-system harvester-webhook-87dc4cdd8-jg2q6 1/1 Running 2 (14m ago) 39h
harvester-system kube-vip-n4s8l 1/1 Running 3 (14m ago) 42h
harvester-system virt-api-799b99fb65-g8wgq 1/1 Running 2 (14m ago) 42h
harvester-system virt-controller-86b84c8f8f-4hhlg 1/1 Running 2 (14m ago) 42h
harvester-system virt-controller-86b84c8f8f-krq4f 1/1 Running 3 (14m ago) 42h
harvester-system virt-handler-j9gwn 1/1 Running 2 (14m ago) 42h
harvester-system virt-operator-7585847fbc-hvs26 1/1 Running 2 (14m ago) 42h

kube-system cloud-controller-manager-harv41 1/1 Running 5 (14m ago) 42h
kube-system etcd-harv41 1/1 Running 2 42h
kube-system harvester-snapshot-validation-webhook-8594c5f8f8-8mk57 1/1 Running 2 (14m ago) 42h
kube-system harvester-snapshot-validation-webhook-8594c5f8f8-dkjmf 1/1 Running 2 (14m ago) 42h
kube-system harvester-whereabouts-cpqvl 1/1 Running 2 (14m ago) 42h

kube-system kube-apiserver-harv41 1/1 Running 2 42h
kube-system kube-controller-manager-harv41 1/1 Running 4 (14m ago) 42h
kube-system kube-proxy-harv41 1/1 Running 2 (14m ago) 42h
kube-system kube-scheduler-harv41 1/1 Running 2 (14m ago) 42h
kube-system rke2-canal-d5kmc 2/2 Running 4 (14m ago) 42h
kube-system rke2-coredns-rke2-coredns-84b9cb946c-qbwnb 1/1 Running 2 (14m ago) 42h
kube-system rke2-coredns-rke2-coredns-autoscaler-b49765765-6bjsk 1/1 Running 2 (14m ago) 42h
kube-system rke2-ingress-nginx-controller-cphgw 1/1 Running 2 (14m ago) 42h
kube-system rke2-metrics-server-655477f655-gsnsc 1/1 Running 2 (14m ago) 42h
kube-system rke2-multus-8nqg4 1/1 Running 2 (14m ago) 42h
kube-system snapshot-controller-5fb6d65787-nmjdh 1/1 Running 2 (14m ago) 42h
kube-system snapshot-controller-5fb6d65787-phvq7 1/1 Running 3 (14m ago) 42h

longhorn-system backing-image-manager-5c32-ea70 1/1 Running 0 13m
longhorn-system csi-attacher-749459cf65-2x792 1/1 Running 6 (13m ago) 42h
longhorn-system csi-attacher-749459cf65-98tj4 1/1 Running 5 (13m ago) 42h
longhorn-system csi-attacher-749459cf65-nwglq 1/1 Running 5 (13m ago) 42h
longhorn-system csi-provisioner-775b4f76f4-h9mwd 1/1 Running 5 (13m ago) 42h
longhorn-system csi-provisioner-775b4f76f4-nvjzt 1/1 Running 5 (13m ago) 42h
longhorn-system csi-provisioner-775b4f76f4-zvd6w 1/1 Running 5 (13m ago) 42h
longhorn-system csi-resizer-68867d54f5-4hf5j 1/1 Running 5 (13m ago) 42h
longhorn-system csi-resizer-68867d54f5-fs9ht 1/1 Running 5 (13m ago) 42h
longhorn-system csi-resizer-68867d54f5-ht5hj 1/1 Running 6 (13m ago) 42h
longhorn-system csi-snapshotter-8469656cc7-6c47f 1/1 Running 6 (13m ago) 42h
longhorn-system csi-snapshotter-8469656cc7-9kk2v 1/1 Running 5 (13m ago) 42h
longhorn-system csi-snapshotter-8469656cc7-vf9z4 1/1 Running 5 (13m ago) 42h
longhorn-system engine-image-ei-94d5ee6c-pqx9h 1/1 Running 2 (14m ago) 42h
longhorn-system instance-manager-beb75434e263a2aa9eedc0609862fed2 1/1 Running 0 13m
longhorn-system longhorn-csi-plugin-85qm7 3/3 Running 14 (13m ago) 42h
longhorn-system longhorn-driver-deployer-6448498bc6-sv857 1/1 Running 2 (14m ago) 42h
longhorn-system longhorn-loop-device-cleaner-bqg9v 1/1 Running 2 (14m ago) 42h
longhorn-system longhorn-manager-nhxbl 2/2 Running 6 (14m ago) 42h
longhorn-system longhorn-ui-7f56fcf5ff-clc8b 1/1 Running 6 (13m ago) 42h
longhorn-system longhorn-ui-7f56fcf5ff-m95sh 1/1 Running 7 (13m ago) 42h
note

If any of Longhorn PODs continues to show the status like Failed/CrashLoopBackOff, do not execute the following steps as many of them rely on the Longhorn to provision persistant volumes for running.

Storage Network

When the Storage Network has been enabled on the cluster, follow those steps to check if the Longhorn PODs have the correct second IP assigned to them.

5.3 Enable Addons

Enable those previously disabled addons, wait until they are DepoloySuccessful.

5.4 Restore the Connection to the Rancher Manager

Run following 1, 2 commands on the Harvester cluster.

  1. Set the management.cattle.io/scale-available of rancher deployment to be the value recorded on the above steps.

This change will enable the auto-scaling.

harvester$ kubectl edit deployment -n cattle-system rancher
apiVersion: apps/v1
kind: Deployment
metadata:
annotations:
...
management.cattle.io/scale-available: "3" // recorded on the above steps
...
generation: 16
labels:
app: rancher
app.kubernetes.io/managed-by: Helm
...
name: rancher
namespace: cattle-system
  1. Scale up the rancher deployment on Harvester cluster.
harvester$ kubectl scale deployment -n cattle-system rancher --replicas=3
deployment.apps/rancher scaled

harvester$ get deployment -n cattle-system rancher
NAME READY UP-TO-DATE AVAILABLE AGE
rancher 0/0 0 0 33d

...

harvester$ kubectl get deployment -n cattle-system
NAME READY UP-TO-DATE AVAILABLE AGE
cattle-cluster-agent 2/2 2 2 23d
rancher 1/2 2 1 33d

note

After the rancher deployment is ready, it will automatically scale up the cattle-cluster-agent deployment quickly.

  1. Check the virtualization management on the Rancher Manager.

The Harvester cluster continues to be active on the Rancher Virtualization Management .

  1. Check the Harvester cluster WebUI.

You should be able to access the Harvester WebUI again.

5.5 Start VMs

5.1 Start Traditional VMs

When there are many VMs deployed on the cluster, don't start all the VMs at the same time, suggest starting them group by group.

Wait until they are Running.

5.2 Rancher Downstream Cluster Machines(VMs)

After the Harvester cluster is re-connected to the Rancher Manager successfully, the Rancher Manager will handle the downstream K8s clusters' machines(vms) automatically. Wait until all the downstream clusters are ready.

See Rancher Manager Access Downstream Clusters to monitor and operator the downstream clusters.

If Rancher Manager does not restart the machines(vms) automatically, you can start those VMs from the Vitrual Machines page on Harvester UI.

note

This depends on the auto-replace and/or other options on Rancher Manager.

5.6 Generate a new Support-bundle File

Generate a new support-bundle file on the Harvester cluster.

Together with the previously generated support-bundle file, the two files record the cluster settings, configurations and status before shutting down and after rebooting. It is helpful for troubleshooting.
